Thursday, August 23, 2007

Stick a Fork in Me I'm Done


....with my book that is. This book was compelling. It was almost as if I were driven to finish it. I'm thrilled to have completed the book, but feel a little deflated now that it's done. It's like my best friend has moved away. Just a few comments on the finished book: I sewed the signatures individually into the spine using ribbon. I had originally planned on using a different binding method, but I forgot to use an odd number of signatures and had to improvise. It was a happy error because I was able to tie keys to the spine this way (if I could have with the other binding I don't want to know about it). The end pages are textured wall paper that was painted with black, copper and aqua.

Sunday, August 19, 2007

Funky Blue Patina


Along with the rusted paper, I have been busy "brewing" copper with ammonia to get a very pretty blue patina. I got this technique from Metal Craft Discovery Workshop by Linda and Opie O'Brien (click on favorite books on right sidebar). Start with a large plastic container with a lid and a small plastic container that fits inside the large container (Picture 1). You will also need a rack to place over the small container - I used hardware cloth that I cut to fit in the big container (Picture 2). Fill the small container half way with ammonia. Place the small container inside the large container and place the rack over the small container (Picture 3). Next you will need salt water, metal (I used both copper and brass) and sand paper (Picture 4). Sand the metal (Picture 5). Rinse the metal with warm salt water (Picture 6). Place the metal on the rack (Picture 7). Sprinkle metal with salt - any kind of salt will do, I like kosher salt because of the size of the grain (Picture 8). Cover the container with a lid (Picture 9). Wait a few hours and uncover - I uncovered mine after 3 hours (Picture 10). Presto! Your metal will have a lovely blue patina. Let the metal dry and then coat with a clear acrylic. I have been using a clear matte spray for the copper mesh book project. Picture 11 shows some pieces I have done. The brass piece is in the top left corner, all of the other pieces are copper. I have been wanting to try this technique for months and was kind of intimidated by it. After doing it, I'm sorry that I didn't start sooner. It's fun, the results are cool and it makes you feel a little like a mad scientist. Have fun and let me know how your experiments turn out. I'm thinking that I want to try some pennies, some copper brads, some brass brads, and........ I could go on and on!

Thursday, August 16, 2007

More Copper Mesh Pages


All of these pages were done with copper mesh, except for the top two. The second is done with old window screen and the first one was done on..................RUSTED Paper (see August 15th's post). I coated the paper with polymer medium so the rust wouldn't migrate to the next page and then stamped and embossed images using Opal embossing powder. The blue was a little bright for this project so I rubbed black paint into it. The fourth picture down is a transparency of Salvador Dali's painting of the crucifiction. I tried to get the flash from reflecting with no luck. Look here for a better picture: http://www.pocanticohills.org/art/art04/elliot.jpg . I thought his interpretation was very moving. When you look at the the fourth picture down, notice the pieces of copper extending from the transparency with the cool blue patina. How did I get that cool blue color you might ask...... stay tuned!


Copper Mesh Book Pages


We have been working on copper mesh books at my local art group. Thanks to Karen Campbell and Terry Ross for all of their help on this project. I love history and tend to go for browns and earthy tones in all my work. I also wanted to do something inspirational. After doing some research on the internet, I decided to model my book after psalters and book of hours. Both were used in the middle ages as prayer books: http://en.wikipedia.org/wiki/Book_of_Hours http://en.wikipedia.org/wiki/Talk:Psalter. The illuminations are beautiful and most of them had more color than I chose to add in mine.


Wednesday, August 15, 2007

Experiments with Rusted Paper


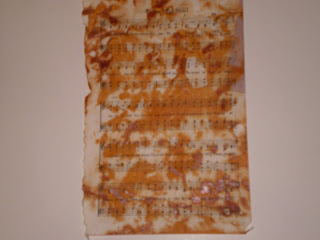
Welcome to my blog. My thanks to Carolyn Durgin for her help in setting up this page. I thought I'd share my latest experiments with rusted paper. I got the idea from Val Foster, a fellow member of Mile High Book Arts. Start with a piece of rusted metal and spray it with a water and vinegar mix. Sprinkle salt over the metal and lay a piece of paper over it. (I do all of this in a plastic bag because it is quite messy. The bag contains the mess and it has the added bonus of rusting the bag, which in turn coats the side of the paper not touching the metal). I do spritz the paper with the vinegar and water mix before laying the paper on the metal. Put a weight over the plastic bag. You can use a heavy book, though I confess to keeping my plastic bag on the floor and just walking on it while working on other things. Results vary by the length of time the paper is left on the metal. For a slight brown wash that looks like walnut ink stained paper let the paper cure one or two hours. For best results leave overnight. What kinds of things can you rust? Use your imagination!! The pictures above show gold metallic tissue paper, a hand dyed paper towel given to me by Nancy Brill, a hymnal page and some baby wipes that I had used for clean up on another project. My friend Val has done plain paper, maps, burlap and muslin. I will definitely post more results as I go. I hope you try it and let me know how your papers turn out. Have Fun!!!